When returning water to your aquarium via a canister filter or sump pump a spray bar can be a beneficial.
This guide will show you how easy it is to make your own aquarium spray bar and highlights some things to consider when building your spray bar.
Benefits Of Spray Bars For Your Aquarium
Spray bars increase water movement and circulation in the tank reducing dead spots within the water column and on the bottom of the tank. This reduces particulate build up as debris will not settle on the substrate, they will instead be captured by the filter.
Spray bars can be used to agitate the water surface and increases gas exchange and thus increase the amount of oxygen in the water.
A spray bar distributes the flow of water out multiple holes, as opposed to a single hole or single pipe return. Sometimes a single pipe return can be too strong and only provides a single point of flow.
Things To Consider When Making An Aquarium Spray Bar
Aquarium Spray Bar Position And Direction Of Flow
Where the spray bar is positioned in the aquarium will impact how it performs. The spray bar can be placed almost anywhere but the common and most beneficial positions are as follows:
- At the top of the aquarium below water level: In this position with the spray directed slightly up surface agitation can be achieved. Generally good flow can be achieved, without being too noisy.
- At the top of the aquarium above water level: Achieves good surface agitation but being above the water surface this can be noisy.
You can also choose to place the spray bar on the back of the aquarium pushing water towards the from or on one side pushing water across to the other side.
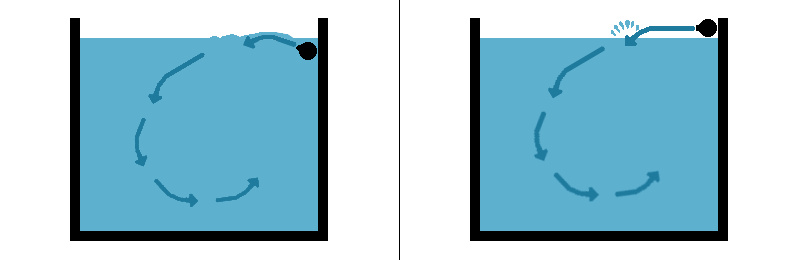
My preferred spray bar position is at the top of the aquarium just below the water surface with the spray bar holes pointing slightly up. In this position noise in minimised yet there is still good water surface agitation and flow.
Flow And Pressure
Along with the flow rate of your canister filter or sump pump the number and size of holes in the spray bar will impact the pressure and hence flow of the water as it comes out of the spray bar.
Smaller or fewer holes will mean more pressure and increased water flow. Larger or more holes will mean less pressure and reduced flow.
I usually use 3mm holes in the spray bar, these are small enough for good water flow ie "spray" and do not clog easily.
I usually have a minimum of 2cm between holes however this can vary depending on the number of holes and the length of the spray bar. For example if the spray bar is 20cm long and only has 5 holes then they would be spaced further apart at about 4cm.
To allow for some variability or tuning of flow from the spray bar I often include one larger adjustable hole which can be opened or closed to adjust the flow rate - see the How To Make a PVC Aquarium Spray Bar section below to see how this is done.
Designing A Spray Bar
An aquarium spray bar can be as simple as a line of holes drilled into a piece of pipe connected to the return hose for your aquarium. This essentially is what a spray bar is.
However to make one that sits in position well without coming loose and spraying water everywhere is also important!
In our spray bar design we have included the following features:
- The spray bar hangs on the back (or side) of the aquarium.
- The spray bar section can be rotated to adjust the direction of the spray bar holes and hence the direction of water flow.
- Includes a flow adjustment on the spray bar to adjust the pressure of the water coming out of the spray bar.
See below for steps on how to build our DIY aquarium spray bar.
How To Make A PVC Aquarium Spray Bar
-
Cut PVC pipe for spray bar
Measure how long you want you spray bar to be. This could be slightly shorter than the back side or end of the tank where the spray bar will be positioned.
Cut a piece of PVC pipe about 2 inches (5cm) shorter than the finished length of the spray bar as we will be attaching 90° elbow to each end.
In this example I'm making a spray bar from 15mm diameter PVC pipe which is 11 inches long (28cm). So this first piece of pipe is cur to 9 inches (23cm) long.
I generally match the diameter of the PVC pipe to the hose diameter meaning I usually use 1/2 inch (15mm) or 3/4 inch (20mm) PVC pipe.
-
Mark out the spray bar
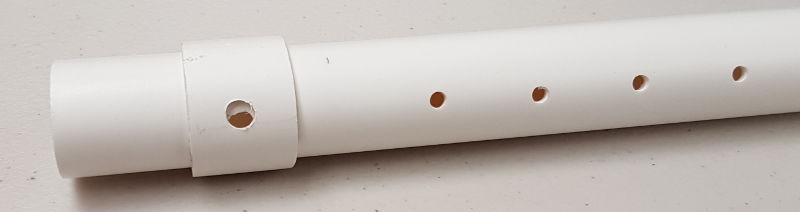
The next step is to plan out the position of fittings and holes in the spray bar. I find it easiest if I put some tape on the PVC pipe at it is then easier to draw on.
- Mark a line 3/4 inch (20mm) from each end of the PVC pipe - this is where the pipe will slide into the fittings on each end.
- A further 3/8 inch (10mm) in on one end mark where a large hole will be. This hole will be about 1/5 Inch (5mm) in diameter and be used for the flow adjustment.
- A further 1 1/2 inches (40mm) along the pipe mark where the first spray hole will go.
- Then for the remaining length of the pipe mark where the remaining spray bar holes will go, I suggest a minimum spacing between holes of 3/4 inch (20mm).
The final mark out of the spray bar should look something like the below picture.
-
Drill holes in the spray bar
Before drilling the holes in the PVC pipe take a nail and create a indent where the holes will be. This will help stop the drill bit from sliding around when you drill the holes.
The large hole at one end which is part of the flow adjustment should be 5mm in diameter.
The remaining spray bar holes should be 3mm in diameter.
-
Build the flow adjustment
Cut a 20mm piece of PVC pipe and then cut a slit along the length of this piece of pipe so that it is like a closed "C".
In the middle of the length of the pipe drill a matching 5mm hole.
The flow adjustment can then be fitted over the top of the spray bar. The flow can then be adjusted by rotating this flow adjuster to either open or close the hole.
-
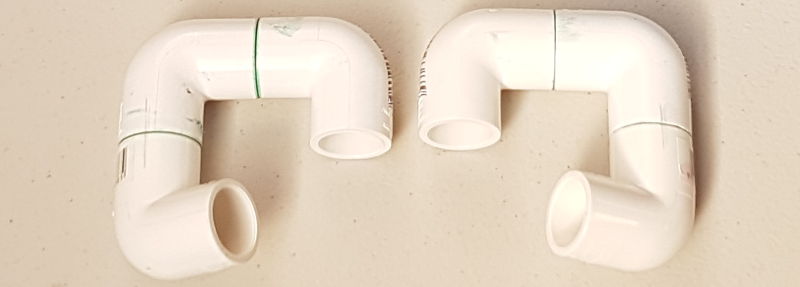
Build two end hooks
Start by gluing two 90° together using a small piece of ~30mm PVC pipe to serve as a joiner.
When gluing these together ensure that they lay flat and align without any twisting. You need to make two of these.
Glue another small piece PVC pipe to serve as a joiner to one end of the two 90° you glued together in the above step.
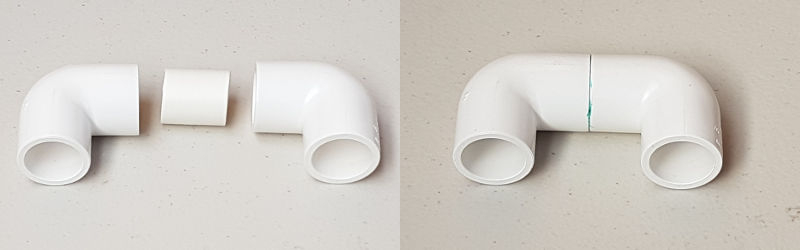
Glued elbows to make end hooks Next add a third elbow which will holding the spray bar snugly in place.
In this case the elbow needs to be positioned on an angle so that when the end hook hangs over the aquarium it does not wobble too much. Test fit and mark the position of the elbow before gluing it into position.
-
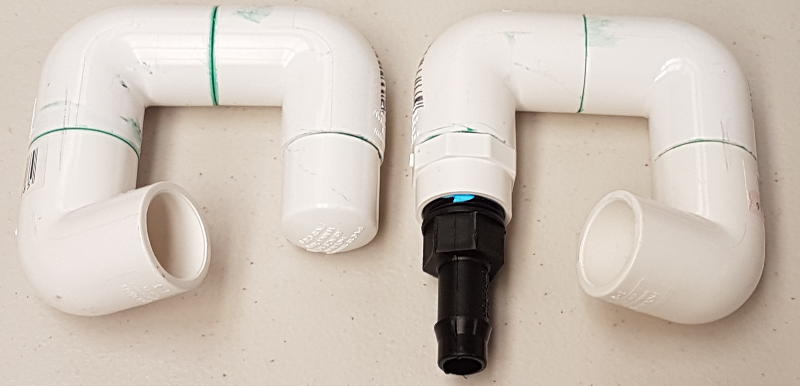
Cap one end hook and barb the other
Decide which end you want your return hose to connect to and select the corresponding end hook, this end hook will have a barb fitting connected to it so you can attach the hose from your return pump or canister filter.
The other end hook will be capped with a end cap.
Take your time with this step to ensure you select the correct end hook for the barb fitting and cap.
-
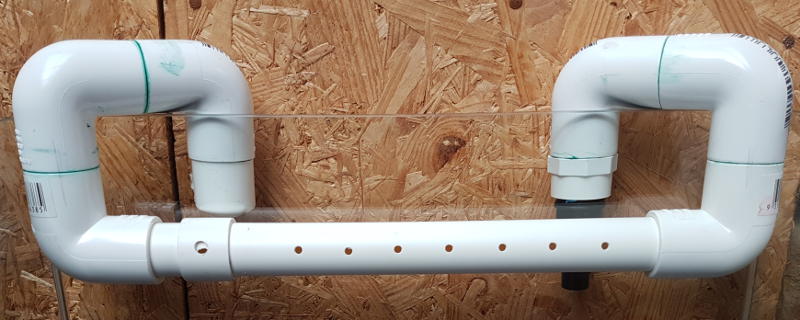
Connect spray bar
Now you have completed all the parts of the spray bar you are ready to assemble it.
Connect one end hook to each end of the spray bar, do not glue these joins, it is not needed and it allows you to adjust the rotation of the spray bar and hence the direction of water spraying out of the spray bar.
-
Anti-siphon hole
When the return pump is turned off water from your aquarium can be siphoned back down to where the return pump is positioned.
This occurs if the spray bar outlets are all below the water surface. Once one of the holes brakes the water surface the siphon will be broken.
To avoid back siphoning from happening drill a small 2mm hole in the spray bar above the water surface.
It is best to drill the anti-siphon hole close to where the water enters the spray bar and still inside the take as a small amount of water may exit this hole.
In this example I drilled the anti-siphon hole into the spray bar hook on the water inlet side of the spray bar.
-
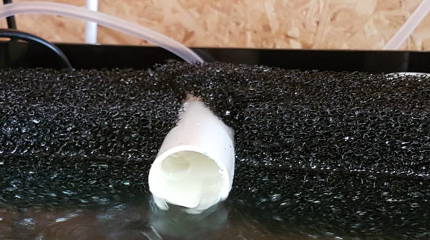
Completed aquarium spray bar
Your aquarium spray bar is now complete! All that is left to do now is to hook it up to your return pump or canister filter.


Conclusion
Aquarium spray bars have several benefits and are easy to make yourself. Making your own aquarium spray bar also allows you to customize it the size that suits your needs.
So if you need an spray bar I highly suggest having a go at making your own.